Video: 4 Must Use Features within the Matterport Capture App12120
Pages:
1
 WGAN Forum WGAN ForumFounder & WGAN-TV Podcast Host Atlanta, Georgia |
DanSmigrod private msg quote post Address this user | |
| WGAN-TV Matterport Capture App and Matterport 3D Showcase App-Short Story #953- Capture App 360 Settings And Adjustments Hi All, In this WGAN-TV Short Story (#953, above), Matterport Content Marketing Manager Amir Frank shows how - and when - to use four (4) features within the Matterport Capture App: ✓ Drag and Rotate ✓ Move to Floor ✓ Remove from Map ✓ Convert to 3D For Matterport Workshop and Matterport Capture App training, see the: ✓ WGAN-TV Training U (in Matterport) Course 50+ WGAN-TV Training Courses are available in the: ✓ WGAN-TV Training U Best, Dan |
||
| Post 1 • IP flag post | ||
 WGAN Fan WGAN FanClub Member Queensland, Australia |
Wingman private msg quote post Address this user | |
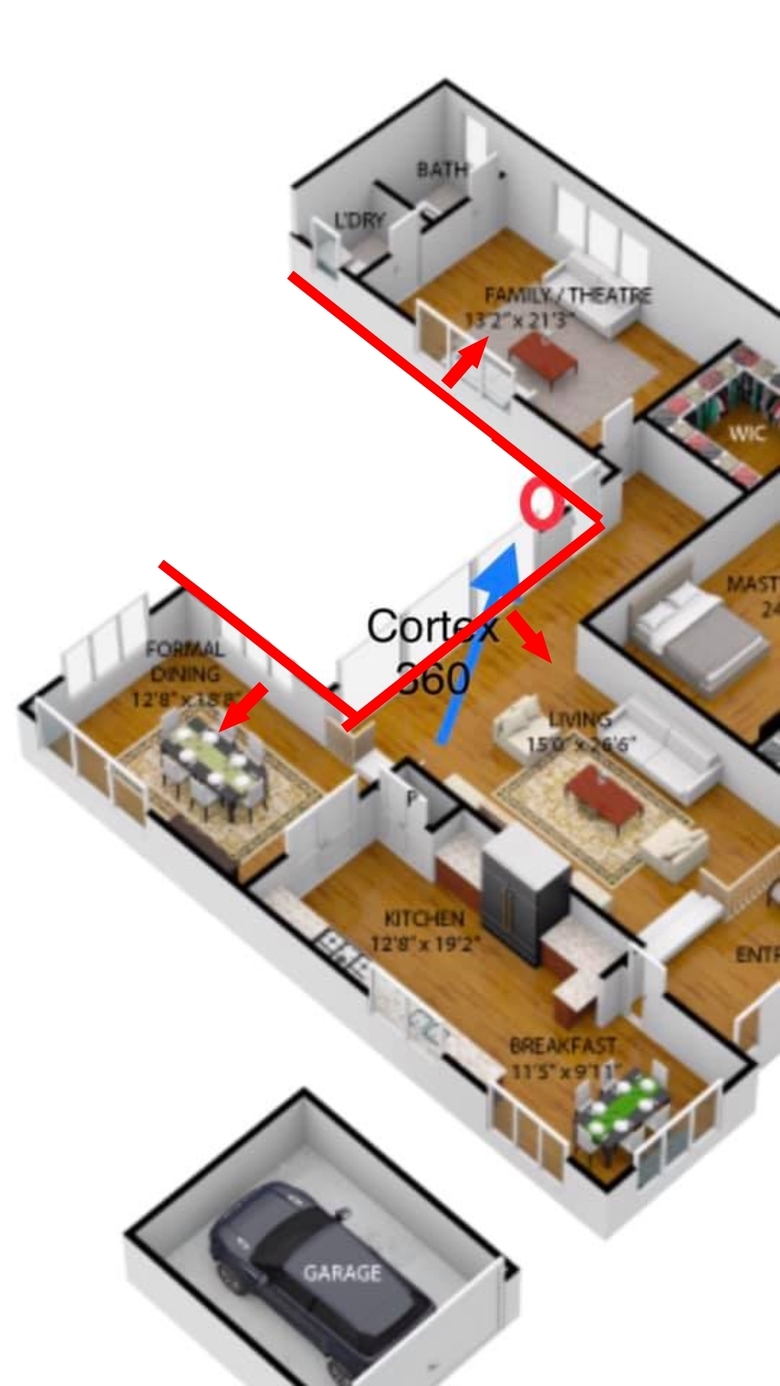
| I can share a few tricks that can help with 3D conversions. 1)When you go outside from inside do one 3D scan close to your internal part that you have just scanned. The idea is that it has to align to any previous and close internal scan. Once it is done with just a bit of mesh generated and aligned do not move your camera. Switch to 360 mode and capture 360. When it is ready you can place the 360 on top of the 3D scan you captured before matching their location precisely. This way you are placing 360 exactly where it has been captured and the 3D scan helps you to pinpoint the 360 location. Once the 360 sits on top of the 3D scan you can delete the 3d scan and then convert the 360 to 3D. You can repeat the same workflow anytime and it will help you with correct location of any 360 before conversion. 2)This one will come with an image as this way is just much easier to show than tell.  if you want to protect your internal scans from any mesh overspray generated after 3D conversion put trim lines around internal part of a model like shown on the image before you use Cortex. You can use the same trick inside as well when you need to fill sunlight spots inside. It is not always necessary to put trim lines completelly surrounding a future conversion. You can just add small trim lines next to the future conversion point just to stop overspray going to the direction you do not want it to go. You do need to keep these trim lines after conversion and you can delete them after. 3) And this has been mentioned many times but it is a good idea to make a duplicate of your scanning project before you start using Cortex. Anything can happen and you need a way to revert back to the version you had before starting using Cortex. Normally using Cortex brings some problems and the most annoying one that it is not accurate at all. I have seen walls to split up because of using Cortex. A minimap may look awful after using Cortex. On my last job I used Cortext in a garage that had the same wall as an internal part of a property but after Cortex they just split up like they where hit with an axe that did not go through. It ended up though with a normal and single wall and without any splitting in its final tour. However that's the biggest problem with Cortex. You cannot see in the Capture app what you will get as a result until you actually get it. |
||
| Post 2 • IP flag post | ||
Pages:
1This topic is archived. Start new topic?


